Home
/ How To Draw The Back Of A Car Step By Step - More images for how to draw the back of a car step by step »
How To Draw The Back Of A Car Step By Step - More images for how to draw the back of a car step by step »
How To Draw The Back Of A Car Step By Step - More images for how to draw the back of a car step by step ». Be sure to add lines on the body and handles (which are very different depending on the car). If you did everything as shown in the instructions, you should get the correct form of the vehicle. To create a silhouette, do not use dark and solid lines, because in the future we will have to erase them. How to draw a cute car step by step#drawingforkids #coloringforkids #howtodraweasy See full list on drawcarz.com
Join millions of creators and explore your creativity. Do not forget that everything should be done in the form of a loose sketch. See full list on drawcarz.com How to draw a car easy and step by step. We do it very roughly (within reasonable limits).
Account Suspended Car Drawings Car Front View Sketch View Sketch from i.pinimg.com Next, create the central part of the rims and depict spokes that diverge from the center to the edges. We do it very roughly (within reasonable limits). On the sides, we are depicting the mirrors and tires. Depict the headlights, wheels, and mirrors. This drawing guide is not complicated and having mastered it, you can sketch a car of any brand. Draw this car by following this drawing lesson. Join millions of creators and explore your creativity. The approximate shape of the car is drawn, but our draft is not similar to a car.
See full list on drawcarz.com
In this step, we will go into the details of the bumper and draw a radiator grille. See full list on drawcarz.com The approximate shape of the car is drawn, but our draft is not similar to a car. See full list on drawcarz.com The team of drawcarz.com today tried to teach you how to draw a car. Do you want to make your car drawing become realistic? See full list on drawcarz.com Remember to add a rearview mirror. Now depict the doors and add the windshield. We will start from the top and will move down, so we are circling the roof, windshield, and the rearview mirror with dark and clear lines. Above, we depicted the car in the form of a loose sketch, and now it's time to go into detailing and giving the car a finished look. If so, be sure to let us know about it. More images for how to draw the back of a car step by step »
After that, give the windows of the automobile a more complete look, delete the needless auxiliary lines. Depict the headlights, wheels, and mirrors. Next, create the arches above them and the window line. See full list on drawcarz.com This drawing guide is not complicated and having mastered it, you can sketch a car of any brand.
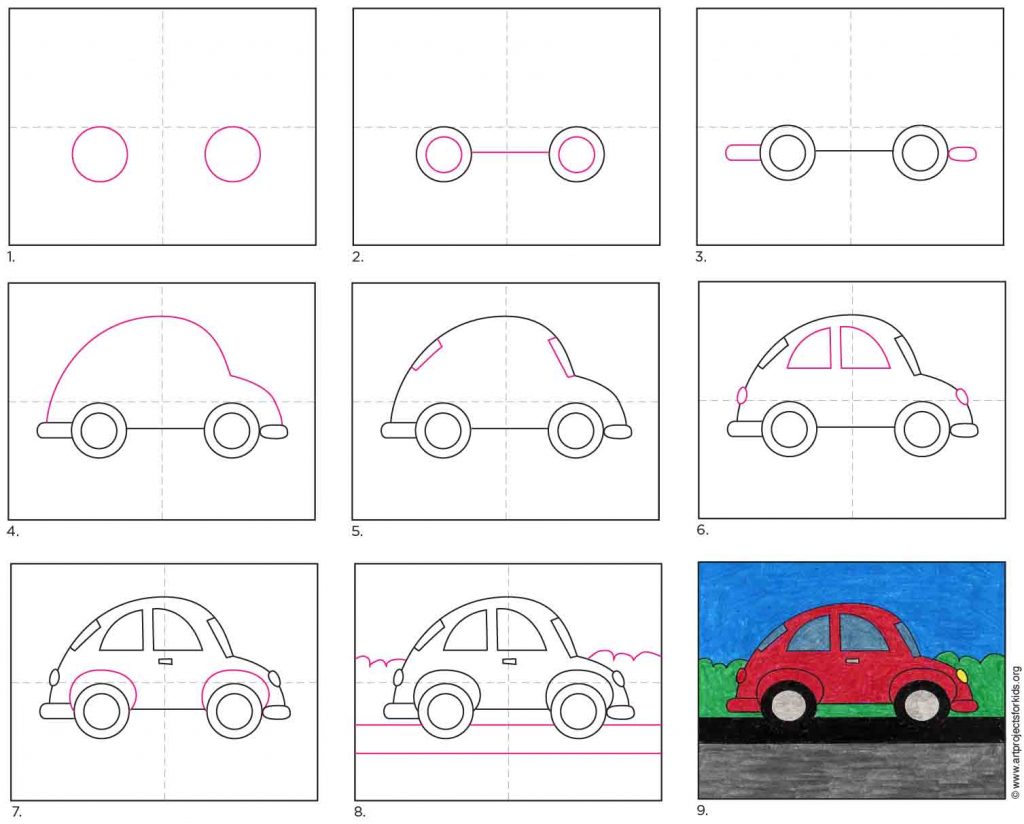
How To Draw An Easy Car Art Projects For Kids from artprojectsforkids.org They should be even and of equal size. The roofs of different cars look completely different, in our example, it is very low and flat. Above, we depicted the car in the form of a loose sketch, and now it's time to go into detailing and giving the car a finished look. Let's start with a sketch. Next, add glare to the glass surfaces to make the car drawing look more voluminous and aesthetic. Now you can gently erase all remaining guidelines. See full list on drawcarz.com After that, give the windows of the automobile a more complete look, delete the needless auxiliary lines.
Let's start with a sketch.
If so, be sure to let us know about it. See full list on drawcarz.com At this stage, it is not necessary to draw perfectly neat lines so that we have a chance for corrections if we make mistake. As you understand, our site is about how to draw different cars, so that in the future we plan to create a lot of cars based on this guide. Join millions of creators and explore your creativity. In this step, we will deal with the most essential details. Now add the wheels, trying to make them the most round and smooth. Now it's time for the doors. in the drawing of the car, we see the car from one side only, so we draw two visible doors. How to draw a car easy and step by step. Now i won't give away all the secrets i learned in the how to draw a car step by step guide, but i'll tell you one of the processes i use now. The sill line refers to the bottom edge of the car. If you are a fan of the series and want to start making some cool drawings you can start here. If you did everything as shown in the instructions, you should get the correct form of the vehicle.
Add some details, such as the grille and the decorative lines on the bumper In this step, we will go into the details of the bumper and draw a radiator grille. A good and competent car drawingconsists of many details. More images for how to draw the back of a car step by step » Do not forget that everything should be done in the form of a loose sketch.
Learn How To Draw Cars For Android Apk Download from image.winudf.com Starting from the third step we start working with trifles and details. Continue to trace and darken the artwork. If so, be sure to let us know about it. How to draw a cute car step by step#drawingforkids #coloringforkids #howtodraweasy Mark the headlights at the front and rear of the vehicle. Repeating all the manipulations, with each step in front of you will get the subject, more and more like a car. All the details also differ depending on the models, but their location is about the same. See full list on drawcarz.com
By the way, this step is very similar to the first step of the lesson about how to draw a car from the back.
In the very initial stage, create a general silhouette of the car. Join millions of creators and explore your creativity. Create a side view of the car you want to draw. Here we can see the lower part, which includes the hood and the bumper, and the upper part, which includes the roof and cabin. The shape and location of these details depend on the nature and style of your future car. In this step, we will go into the details of the bumper and draw a radiator grille. These actions must make the body of the car bulky and give some dynamics to it. If the initial loose and rough sketch of the car is ready, then it's time to start working with the final touches and more detailed work on the sketch. See full list on drawcarz.com Also, do not forget to visit the rest of the pages of our site to become a real artist and even a car designer. Depict the top edge of the trunk and the tail lamps. At this stage, it is not necessary to draw perfectly neat lines so that we have a chance for corrections if we make mistake. Experiment with the number and location of the shadows to better understand how the shadows should look.
Join millions of creators and explore your creativity how to draw the back of a car. Sign up today & get started for free!